Guide to Cargo
Если я закончу тут будет руководство по отправке почты и прочей ерунде каргонцев
Глава отдела
Квартирмейстер
Канал связи :u
| Отдел снабжения • Шахтёрский Аванпост |
Отдел снабжения - то, что поддерживает жизнь станции, благодаря постоянным поставкам от АКН «Трурль» и лаваленда. Он состоит из двух основных частей:
- Шахтёров, вечно подвергающих свою жизнь опасности на адской планете, ради снабжения станции крайне востребованной рудой.
- Отдел погрузки и офис, откуда и происходит снабжение, доставка почты, а также приём и выдача заказов экипажа станции.
Работа в карго довольно проста, что делает его идеальным местом для новичков. Это руководство описывает основные принципы работы в отделе снабжения.
Основные инструменты
Ваш арсенал состоит из множества полезных вещей. Умение работать с ними поможет вам стать успешным Грузчиком.
Причина: Требуется перевод и спрайты 64х64
Оборудование карго
Офисные принадлежности
| Название | Описание |
|---|---|
Rapid Crate Sender 
|
Используется для телепортации ящиков и шкафов к телепадам карго. Может быть взломан ЕМАГом. |
Destination Tagger 
|
Используется для установки пункта назначения при отправке по почте. Выберите место отправки и кликните на упакованный объект. Дополнительные можно сделать в автолате. |
Approval Stamp 
|
Используется для одобрения документов и манифестов. |
Denial Stamp 
|
Используется для отклонения документов. |
Quartermaster's Stamp 
|
Чтобы документы выглядели ещё более официально. Изначально есть в офисе квартирмейстера. |
Wrapping Paper 
|
Используется для оборачивания ящиков и прочего. Это необходимо для отправки по почте. Можно найти в автоматах Artvend. |
MULEbot 
|
Робот-доставщик, используемый для доставки ящиков в специальные места сброса. Можно управлять с КПК карго. Дополнительных можно заказать у ЦК. Может быть взломан. |
Filing Cabinet 
|
Для хранения бумажек. Можно заказать у ЦК. |
Clipboard 
|
Для хранения бумажек. Можно заказать у ЦК. |
Shipping Manifests 
|
Приходит с каждым заказом. После одобрения, может быть выслано на ЦК для получения кредитов на счёт Отдела снабжения. |
Space Cash 
|
Можно снять или положить на счёт через ATM. Очень важны для совершения заказов. |
EFTPOS 
|
После настройки, любой член экипажа сможет провести своей картой, чтобы совершить денежный перевод на выбранный счёт. Полезно, если вы ведёте какой-то бизнес. |
Crates 
|
Используются для хранения вещей и их отправки. Можно найти повсюду |
Почта
| Название | Описание |
|---|---|
Mail Scanner 
|
Это устройство позволяет вам регистрировать факт доставки почты ради получения денежного вознаграждения. Просканируйте письмо, чтобы ввести его в базу данных, после чего просканируйте человека, которому хотите его передать. Верное сканирование получателя добавляет кредиты на счёт Снабжения. |
Mail Crate 
|
Пластиковый ящик для хранения почты. |
Mail Bag 
|
Сумка для хранения конвертов, печатей, ручек и бумаг. |
Letter 
|
То, что вы будете доставлять экипажу. Больше вы можете получить через шаттл карго. |
Снаряжение шахтёров
См. Руководство по шахтёрскому ремеслуОборудование
| Название | Описание | ||||||||||||||||||||||||||||||||||||||||||||||||||||||||||||||||||||||||||||||||||||||||||||||||||||||||||||||||||||||
|---|---|---|---|---|---|---|---|---|---|---|---|---|---|---|---|---|---|---|---|---|---|---|---|---|---|---|---|---|---|---|---|---|---|---|---|---|---|---|---|---|---|---|---|---|---|---|---|---|---|---|---|---|---|---|---|---|---|---|---|---|---|---|---|---|---|---|---|---|---|---|---|---|---|---|---|---|---|---|---|---|---|---|---|---|---|---|---|---|---|---|---|---|---|---|---|---|---|---|---|---|---|---|---|---|---|---|---|---|---|---|---|---|---|---|---|---|---|---|---|
Autolathe 
|
Машина для производства инструментов, материалов и многих других вещей. Наиболее часто используемое устройство в отделе снабжения. Для списка рецептов см. Автолат. Он также может быть взломан. | ||||||||||||||||||||||||||||||||||||||||||||||||||||||||||||||||||||||||||||||||||||||||||||||||||||||||||||||||||||||
Photocopier 
|
Используется для копирования документов. | ||||||||||||||||||||||||||||||||||||||||||||||||||||||||||||||||||||||||||||||||||||||||||||||||||||||||||||||||||||||
Ore Redemption Machine 
|
Устройство, превращающее руду в пригодные для использования материалы, взамен вознаграждая шахтёров очками, которые они могут тратить в своём раздатчике. | ||||||||||||||||||||||||||||||||||||||||||||||||||||||||||||||||||||||||||||||||||||||||||||||||||||||||||||||||||||||
Cargo Telepad 
|
То, куда отправляются ящики при телепортации. Используйте с RCS. Дополнительные телепады вам могут распечатать в РнД. | ||||||||||||||||||||||||||||||||||||||||||||||||||||||||||||||||||||||||||||||||||||||||||||||||||||||||||||||||||||||
Mining Equipment Vendor 
|
Торговый автомат с шахтёрским снаряжением.
Включает в себя:
| ||||||||||||||||||||||||||||||||||||||||||||||||||||||||||||||||||||||||||||||||||||||||||||||||||||||||||||||||||||||
CargoDrobe 
|
Торговый автомат с одеждой вашего отдела. Может быть взломан.
Содержит:
| ||||||||||||||||||||||||||||||||||||||||||||||||||||||||||||||||||||||||||||||||||||||||||||||||||||||||||||||||||||||
Recycler 
|
Shreds any small items into pieces, extracting materials from them in the process. Can be emagged. | ||||||||||||||||||||||||||||||||||||||||||||||||||||||||||||||||||||||||||||||||||||||||||||||||||||||||||||||||||||||
Recharger 
|
Used to recharge any small items. In cargo, most commonly used to charge the RCS. | ||||||||||||||||||||||||||||||||||||||||||||||||||||||||||||||||||||||||||||||||||||||||||||||||||||||||||||||||||||||
Cell Charger 
|
Used to recharge power cells. | ||||||||||||||||||||||||||||||||||||||||||||||||||||||||||||||||||||||||||||||||||||||||||||||||||||||||||||||||||||||
Suit Storage Unit 
|
Secure equipment storage. Can be found in the Mining Outpost and the Quartermaster's Office. | ||||||||||||||||||||||||||||||||||||||||||||||||||||||||||||||||||||||||||||||||||||||||||||||||||||||||||||||||||||||
Nanotrasen Merch Vendor 
|
A public vending machine containing toys and other merch.
Contents include:
| ||||||||||||||||||||||||||||||||||||||||||||||||||||||||||||||||||||||||||||||||||||||||||||||||||||||||||||||||||||||
Supply Computers
| Name | Description |
|---|---|
Mining Shuttle Console 
|
Control panel of the mining shuttle. Required to travel between the station and Guide to Lavaland#Lavaland. |
Supply Shuttle Console 
|
Used for making cargo orders, approving (and denying) already existing orders, and controlling the Cargo Shuttle. It can also be hacked. |
Supply Ordering Console 
|
Similar to the supply shuttle console but public, and cannot control the cargo shuttle. |
Mining Camera Console 
|
Used for |
Stacking Console 
|
Grabs leftovers from the recycler and turns them into material sheets. |
Supply Management Console 
|
A tool that allows the Quartermaster to fire their staff, as well as allowing them to hire more. |
Autolathe 
An autolathe is a fabricator of tools and materials. It must be filled with a certain amount of metal or glass before being able to create these items, and it can also recycle these items if needed. Managing your autolathe is a task that's both important, and easy to pick up.
People will come to your office, asking for certain items. As a Cargo Technician it is your duty to answer those requests!
Using the Autolathe
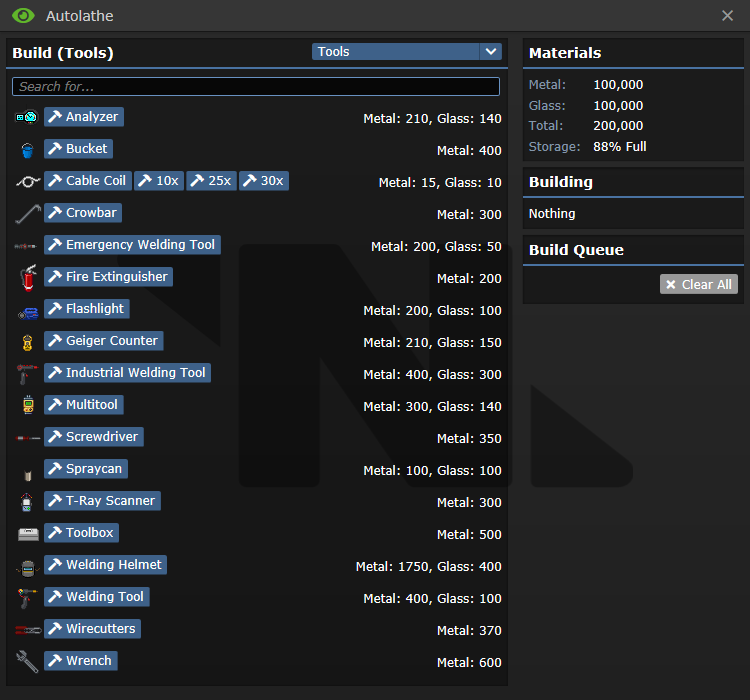
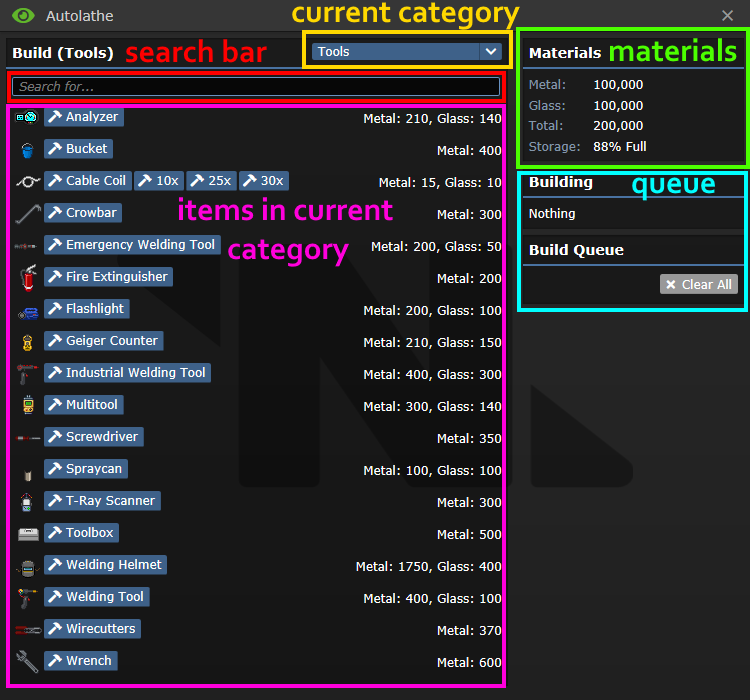
After clicking on the Autolathe, it will present you with this window:
If a position is grayed out, it means autolathe is out of either metal or glass.
To find an item, either look for it in the correct category, or use the search bar.
What items can the Autolathe print?
Ore Redemption Machine 
Your colleagues working in mining regularly deliver materials, and put them inside of this giant smelter. After they leave, it becomes your job to dispense those goods to the ravenous crew. Certain jobs can access the ORM freely, but, for example, assistants, cannot. Those kinds of crew need your help with getting what they need.
Stations needs those materials for research, saving lives, or even simply redecorating.
Taking and Filling Orders 
Request console is the ever-beating heart of cargo. People can spend their hard-earned money (or corporate funds) on items that cannot be found anywhere else.
Using the Supply Shuttle Console
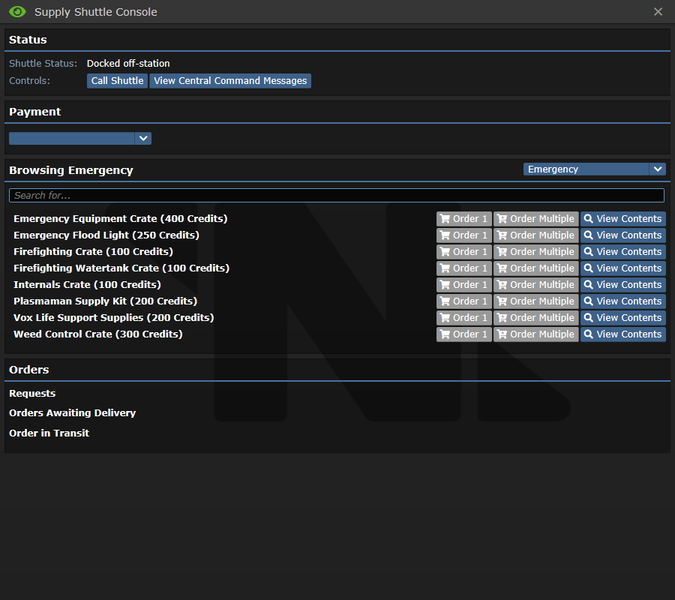
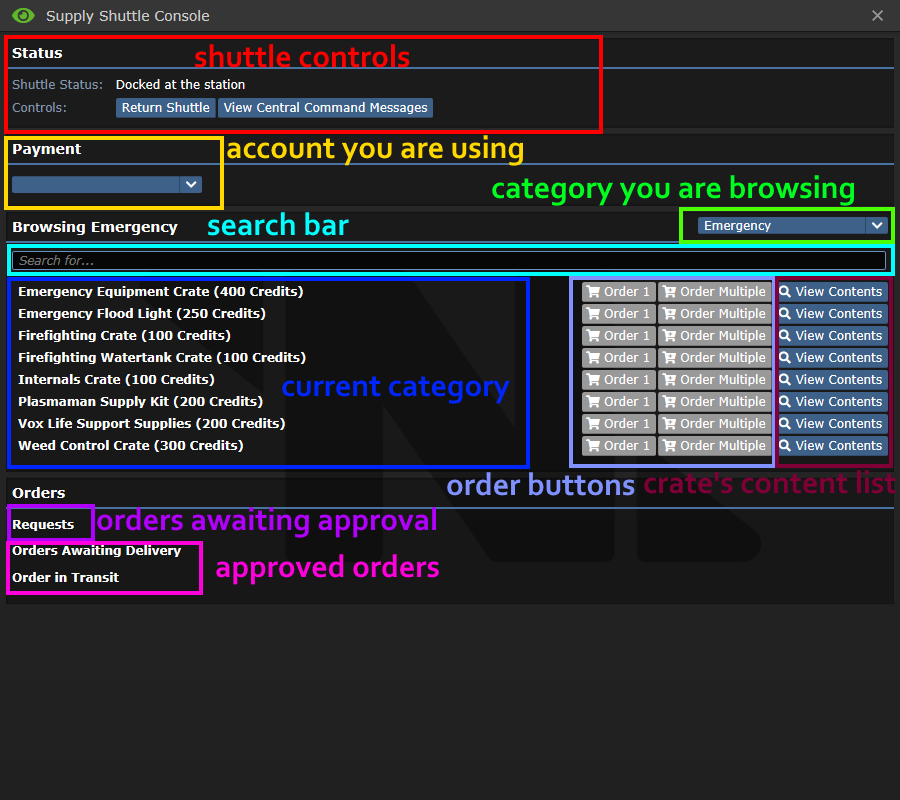
After clicking on the console, it will present you with this window:
Ordering Crates
In order to order a crate:
- Choose the account.
- Find what you are looking for. You can use both the categories, or the search bar.
- Select amount of orders you are making, fill out the reason.
- If you are a Cargo Technician, approve your order and wait for it to arrive.
- What can be ordered?
Approving Orders
- Personal Account Orders
If an order was placed with someone's personal account, any Cargo Technician can approve it. To do so, simply click the Approve button.
- Departmental Account Orders
If an order was placed with a departmental account, only the appropriate command member can approve it.
Supply Account is different, as any Cargo Technician can also approve orders with it.
Here is a table of which head may approve what:
| Account | Can approve orders |
| Command | Captain, Head of Personnel, Nanotrasen Representative and Blueshield |
| Security | Captain and Head of Security |
| Engineering | Captain and Chief Engineer |
| Science | Captain and Research Director |
| Medical | Captain and Chief Medical Officer |
| Service | Captain, Head of Personnel, Nanotrasen Representative and Blueshield |
| Supply | Captain, Head of Personnel, Quartermaster, Any VIP and Cargo Technicians |
| Assistant | Captain, Any Head and Any VIP |
- Denying Orders
In case there is something sketchy about an order, you should consult the Quartermaster wether to approve it or not.
An example (shown in the UI pictures) would be Mr. Rob Banks, an assistant, ordering combat shotguns for "redecorating".
To deny an order, press the Deny button.
Bureaucracy 
After any order is placed, a ![]() Requisition Form will be printed. You can
Requisition Form will be printed. You can ![]() stamp them appropriately and place them in your
stamp them appropriately and place them in your ![]() cabinet or your
cabinet or your ![]() clipboard.
clipboard.
It is done in case something unusual happens. Access to any paperwork should usually be granted to internal affairs agents for purposes of investigations.
After any order arrives on station, it comes with a ![]() Shipping Manifest. Those are needed when exporting goods.
Shipping Manifest. Those are needed when exporting goods.
In addition, sometimes, the Quartermaster may enforce Paperwork for other goods.
It usually results in giving ![]() item request forms to public, and only then fulfilling their orders.
item request forms to public, and only then fulfilling their orders.
It is done to keep a better track of supplies being distributed, but otherwise it slows everything down and makes crew very annoyed.
It is highly advised to drop any paperwork once a massive, station-wide threat is confirmed.
Deliveries
Delivering orders is a major part of your job! There is a mountain of ways to do so, some more effective than others.
Using a MULEBot 
MULEbots are essentially delivery bots. You can load them up with crates and send them where they need to be at!
You can find two in the Cargo Bay, or order a few more!
Sending Crates
- Drag the
 crate on to the
  MULE.
MULE. - Set a destination with your
 PDA or on the control panel.
 - Send the MULE off!
MULEbot maintenance
- To fix MULEbot's damage:
In the case your MULE has been injured but not destroyed you can repair it in 5 easy steps.
- Unlock the Bot with an appropriate
 ID.
ID. - Screw open the maintenance panel with a
 Screwdriver.
  Weld the bot until it is fixed.
- Screw close the maintenance panel with a
 Screwdriver.
 - Lock the Bot with an appropriate
 ID.
ID.
- To re-charge a MULEbot:
In the case your MULE has ran out of power, follow these steps.
- Open up the maintenance panel with a
 screwdriver. (Make sure the controls are unlocked first!)
 - Take out the
 power cell. (Top entry.)
 - Insert charged
 power cell.
 - Close panel with
 screwdriver.
 - Turn the
 MULEbot back on.
Hidden Functionality
Any MULEbot can be hacked to change it's behaviour. It is worth noting, hacking MULEs is against the SoP and may get you fired.
Disposals Mail
This is an alternative way of delivering items, and is usually preferable to MULE transport as long as the pipes are still intact.
- Wrap your item/crate with
 package wrapper.
 - Pick up the
 destination tagger and click it to set a destination.
 - Use the
 destination tagger on the Файл:Wrapped Crate.png parcel.
- Optional: Use a
 pen to write a message on the Файл:Wrapped Crate.png parcel, or custom set a destination.
- Optional: Use a
- Stick it on the
 conveyor, or dump it in a
  disposals unit, and let the system handle it.
- Tip: Click and drag the Файл:Wrapped Crate.png large parcels to
 disposals units to put them in. This can only be done a few times however.
- Tip: Click and drag the Файл:Wrapped Crate.png large parcels to
You can also gift wrap packages, but these cannot be tagged with a destination, and have to be delivered manually. This will not work with large objects. The process is slightly more complicated.
- Pick up the item you want to wrap.
- Hold a sharp object in your other hand. (
 Wirecutters are the most common for this.)
 - Click the
 wrapping paper with the item you want to wrap.
Gift wrapping a human is also possible, but they must have a straight jacket on and you need the wrapping paper in your hand. This is usually not a good idea.
Request Console Shipping Файл:Request Console.gif
Used for smaller, item-sized shipments. Does NOT support delivering crates.
- Find the nearest Файл:Request Console.gif Request Console
- Click the "Print Shipping Label" button.
- Select the destination.
- Swipe your
 ID card on the Файл:Request Console.gif console, press the "Print Label" button.
 - Put the item inside of the Файл:Shipping Package.png shipping package.
- Seal the Файл:Shipping Package.png package. (Use the box in hand.)
- Put it inside of a
 disposal unit.
The Telepads
Cargo Office and RnD start with a ![]() cargo telepad.
cargo telepad.
You can link the ![]() Rapid Crate Sender (RCS for short) with said telepads. RCS can then be used to teleport crates and lockers to that telepad.
Rapid Crate Sender (RCS for short) with said telepads. RCS can then be used to teleport crates and lockers to that telepad.
- Teleporting Crates
- Recharging the RCS
- Put the
 RCS into a
  recharger. (It can be found in your office.)
 - Wait.
- Once the recharger starts glowing yellow, click it to take the
 RCS out.
Using the telepads efficiently
When a massive order arrives, a smart cargo employee may move their telepad to the delivery spot. To do so,
A bored Cargo Technician may choose to grab the ![]() RCS and go Crate Hunting in Maintenance. It is a good idea to move the
RCS and go Crate Hunting in Maintenance. It is a good idea to move the ![]() telepad closer to the Export Conveyor Belt in Cargo Bay.
telepad closer to the Export Conveyor Belt in Cargo Bay.
Getting more telepads
To get more ![]() telepads, you can ask RnD for
telepads, you can ask RnD for ![]() Telepad Beacons.
Telepad Beacons.
Use one in hand to summon a brand new ![]() telepad.
telepad.
The Loader MODSuit 
You can order a special MODsuit from Central Command. The Quartermaster starts with one in their office. Once activated, it allows the user to carry up to six crates.
- Using a MODsuit
To use a MODsuit, place it on your backpack slot, where your satchel/backpack would normally go. You can also place items into the MODsuit as you would place them into a backpack, if it's equipped with a Storage Module. Deploy each part of the suit, and then activate it.
- Loading a MODsuit
- Select the Файл:Mod Loader Clamp.png Loader Hydraulic Clamp module.
- Hold the "ALT" button and click a
 crate.
- Unloading a MODsuit
- Select the Файл:Mod Loader Clamp.png Loader Hydraulic Clamp module.
- Hold the "ALT" button and click on an empty floor tile.
By Foot
Extremely inefficient, but when everything else fails, grab the crate and take it straight to it's new owner!
To drag a ![]() crate, hold "CTRL" and click it.
crate, hold "CTRL" and click it.
Station Mail
Sick of sitting around in Cargo, waiting for the next order to come in? Mail is a great alternative to earning credits for cargo and it gets you moving around the station!
Obtaining Mail
- Every 15 minutes, a
 mail crate will be delivered to the station via shuttle. It contains 5 letters to be delivered to crewmembers. These letters contain a random item and some amount of credits!
 - Take the crate off the shuttle and open it up. You can collect the letters with a
 mail bag, which can be found in a cargo locker, or can be made with cloth.
 - You don't get any credits from putting the
 mail crate back on the shuttle, so feel free to destroy it for plastic or use it as storage.
Delivering Mail
- Grab your
 mail scanner, which can be found in your pocket or be created in an autolathe, then scan the letters with the mail scanner to add them to the database. It's important to register them in the database, or they won't be valid for financial compensation. It is worth noting, mail scanner works at a surprisingly large range!
 - When you find the crewmember, scan them with the
 mail scanner. If successful, just hand over the letter! However, if it's denied, check if it's the correct name; it can also be denied if they are dead or SSD.
- Can't find the recipient? Luckily, your radio and PDA can help, and is an easy way of getting in contact with them! You can also check the manifest and see what department they are in, so visit there and ask their co-workers. The letters also have a wax stamp on them that indicates their department by colour.
- Once the letter has been delivered, 100 credits will be sent to supply's account.
Exports
Exporting goods is an important part of your job too. It generates income for supply department, which you can then spend on goods! To correctly export an item, it needs to be on the Supply Shuttle. If an item isn't a crate, it needs to be inside of one.
- Here is a list of items that can be exported
- For further explanation of pricing, see Station Economy.
Leftover Money
If supply account is filled with cash (read: there is about 2500 spare credits), and the Quartermaster allows it, as per your SoP, you can spend some of it on whatever you want!


