Руководство по разработке
This guide is intended to teach newbies how to set themselves up for success when attempting to contribute to Paracode.
Please read this guide from top to bottom.
Шаблон:Toc right
In order to completely contribute to Paradise you will need three things
- A Text Editor (VSCode heavily Recommended)
- Github
- The native BYOND editor Dream Maker
Quick Jump Section
I am Completely New
I need to install VSCode
I need to setup Git/Github
I've downloaded Stuff how do I get the Repository setup?
Ok, I have the repository setup, how do I change stuff?(Pull Requests)
I want to use TortoiseGit(not for beginners)
I want to use Github Desktop(beginner friendly)
Ok I have all my stuff setup! How do I code/contribute to the server?
I'm contributing now! Wait, how the hell do I use TGUI?
I am Completely New
Alright, you're in the situation just about every paradise developer has ran into. How the hell do I learn to contribute? How do I add my code to the server code? Well, there's a few steps to getting you setup.
Just read this guide top to bottom until you reach a declared stopping point. As long as you follow all the steps you should be all set!
Setting up Visual Studio Code
Installing VScode
- Go to VSCode's website: https://code.visualstudio.com/
- Download the appropriate build for your system and install it.
Installing VSCode's plugins
When you open the Paradise repository locally, you will also get a notification to install some recommended extensions, including these ones
- Go to VScode's website and download the following plugins
- Clicking install will redirect you to VSCode where you can click install and reload it.
- Syntax highlighting: https://marketplace.visualstudio.com/items?itemName=gbasood.byond-dm-language-support
- Symbol seach: https://marketplace.visualstudio.com/items?itemName=platymuus.dm-langclient
- These plugins are extremely useful for coding in DM and should be considered essential
Setting up Github
This part is about setting up Git and setting up your Github account.
Installing Git Bash
- Go here: http://git-scm.com/downloads
- Download the Windows Git program. The appropriate, newest one for your operating system
- It should look something like 'Git-2.18.0-64-bit.exe'
- Install it and leave everything on default (just keep clicking next).
- Wait till the installer has finished.
- Done!
Register On Git
(Skip if you already have an account, duh) You'll need a github account to contribute to our repository (The place where the code is stored) properly.
- Head over here: https://github.com/
- Click Signup and Pricing in the top right-hand corner.
- Click the Create free account button'.
- Create an account with your username and email.
- Done!
Hide your Email (Optional, Recommended)
Some of you might not want to show on your resume you worked on a spessman fart simulator. Or more practically, SS13 community is dark and full of terrors, and you would want to protect your email-address (Or use a disposable one in the first place). Oh and, you might want to contribute to ERP servers under alternative account name.
- Log into your account on Github
- Go to the upper right, click your user profile
- A bar should pop up. Click settings
- Go to Email
- Set your email to private. Github will now use a noreply email address for web operations.
- Now you're somewhat more protected!
Configure Git (Optional)
- Head here: https://help.github.com/articles/set-up-git/#setting-up-git
- Follow the guide above from steps 2 to 4, you can install Git for Windows if you want however it's not recommended
- Now you have Git all setup, but if you're command line illiterate like me, you'll wanna have some fancy graphics!
Additional Help
Helpful videos for better understanding Github
Forking ParaCode
Now, visit The Paradise Github Repository You’ll want to press the Fork button in the top right corner.

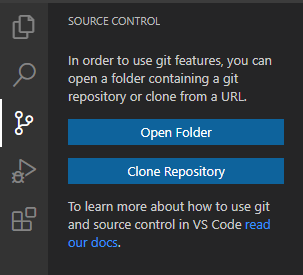
Woah, now you have your own repository! Now, let’s combine your repository and VS Code! Now, go back to VS Code and relaunch it. Under the version control sidebar (looks like a tree branch) click Clone Repository. It should look like this:
If that’s not there, you can press Ctrl+Shift+P to open the command palette, then type Git: Clone and then press enter.
Now, paste the URL of the repository you created in the last step. It should look like this: https://github.com/YOURNAME/Paradise Then, select a folder to keep your local repository. The process of downloading might take a while. Once it’s downloaded, open the folder in VS Code. You now have your own local copy of the code!
VS Code Extensions
Click the Extensions button on the left bar (It looks like a bunch of squares), or press Ctrl+Shift+X. You should see a number of recommended extensions. If you don’t, type @recommended into the search bar. At the very least, you'll want to install the necessary extensions listed below. The nice-to-have extensions are not required, but provide various quality of life improvements.
Necessary Extensions
- BYOND DM Language Support - syntax highlighting for the DM language
- DreamMaker Language Client - fancy features like debugging and jumping to definitions
- EditorConfig for VS Code - loads the standardized editor configuration for the codebase
- ESlint - provides linting for Javascript (this is only necessary if you plan on working with TGUI)
Nice-to-have Extensions
- GitLens - provides a handful of nice features, most notably the ability to select a line of code, see when it was last modified, and by whom
- Error Lens - highlights lines of code which have compilation errors, and displays the error on the same line
- GitHub Pull Requests - lets you make a pull request directly from the editor
- Git Graph - lets you work with branches visually for ease of use
Adding Paracode as an Upstream Repository
We need to add the main Paradise repository as a remote now.
To do this, open the command palette, type Git: Add Remote, and press enter. Next, you'll be prompted for the URL of the remote, and then the name of the remote. Enter https://github.com/ss220-space/Paradise for the URL, and upstream for the name. After you've done that, you’ll have the main Paradise repository as a remote named upstream: This will let you easily send your pull requests there later.
Making Changes
First, let’s talk about branches. First thing to do is to make a new branch on your fork. This is important because you should never make changes to the default(master) branch of your fork. It should remain as a clean slate.
For every PR you make, make a new branch. This way, each of your individual projects have their own branch. A commit you make to one branch will not affect the other branches, so you can work on multiple projects at once.
Branching
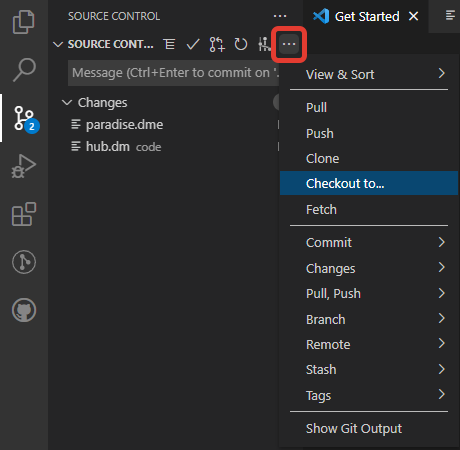
To make a new branch, open up the source control sidebar. Navigate to the More Actions menu (looks like ...) and click Checkout to... like this:
Then, click Create new branch. For this guide, I’ll be creating a new hat, so I’ll name my branch hat-landia. If you look at the bottom left hand corner, you’ll see that VS Code has automatically checked out our branch:![]()
Remember, never commit changes to your master branch! You can work on any branch as much as you want, as long as you commit the changes to the proper branch.
Go wild! Make your code changes! This is a guide on how to contribute, not what to contribute. So, I won’t tell you how to code, make sprites, or map changes. If you need help, try asking in the #spriting or the #coding_chat Discord channels.
Changing Code
You’ll find your code to edit in the Explorer sidebar of VS Code; if you need to find something, the Search sidebar is just below that.
Old-school style: If you want to use DreamMaker instead, go ahead and edit your files there - once you save them, VS Code will detect what you’ve done and you’ll be able to follow the guide from there.
Now, save your changes. If we look at the Source Control tab, we’ll see that we have some new changes. Git has found every change you made to your fork’s repo on your computer! Even if you change a single space in a single line of code, Git will find that change. Just make sure you save your files.
Testing Your Code
The easiest way to test your changes is to press F5. This compiles your code, runs the server and connects you to it, as well as automatically giving you admin permissions. It also starts a debugger that will let you examine what went wrong when a runtime error happens. If you want to avoid the debugger press Ctrl + F5 instead.
This does not automatically make you an administrator in-game so you will need to copy everything from /config/example into /config. Then you will need to edit the /config/config.toml file by adding a {ckey = "Your Name Here", rank = "Hosting Provider"} line to the admin_assignments list.
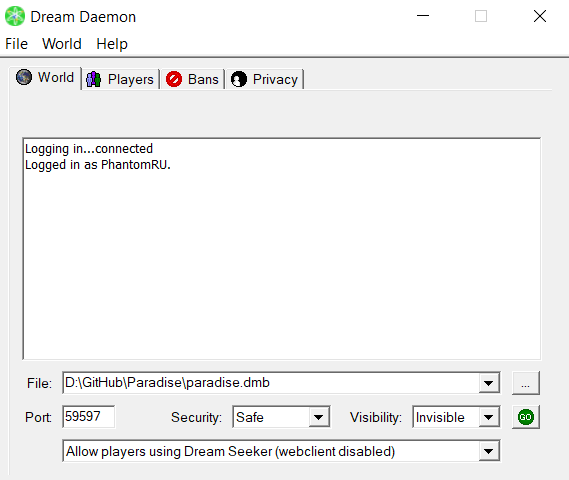
This compiles the code to a dmb file. Then you can run Dream Daemon, select the dmb file, set security to Trusted and hit GO to run the server. After the server starts you can press the button above the GO / STOP button (now red) to connect.
Be sure to always test not only if your changes work, but also if you didn’t actually break something else that might be related.
Committing to Your Branch
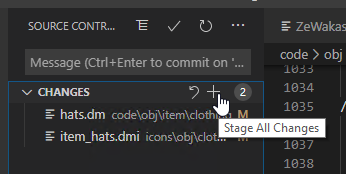
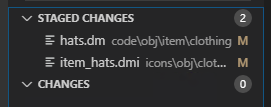
Hover over the word Changes and press the plus sign to stage all modified files. It should look like this:
Or, pick each file you want to change individually. Staged files are the changes you are going to be submitting in commit, and then in your pull request. Once you’ve done that, they’ll appear in a new tab called Staged Changes.
Click on one of the code files you’ve changed now! You’ll see a compare of the original file versus your new file pop up. Here you can see, line by line, every change that you made. Red lines are lines you removed or changed, and green lines are the lines you added or updated. You can even stage or unstage individual lines, by using the More Actions (...) menu in the top right.
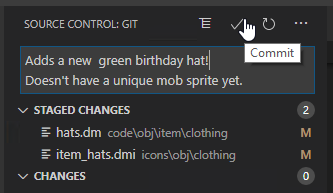
Now that you’ve staged your changes, you’re ready to make a commit. At the top of the panel, you’ll see the Message section. Type a descriptive name for you commit, and a description if necessary. Be concise!
Make sure you’re checked out on the new branch you created earlier, and click the checkmark! This will make your commit and add it to your branch. It should look like this:
There you go! You have successfully made a commit to your branch. This is still ‘unpublished’, and only on your local computer, as indicated by the little cloud and arrow icon in the bottom left corner.
Publishing to GitHub
Click the GitHub icon on the left sidebar. It looks like a cat in circle. Now, you’ll want to click the + sign that appears in the top left, like this:
Then, select the upstream repo and target the master branch. Then, you’ll be able to select the title of your PR. The extension will make your PR with your selected title and a default description. BEFORE SUBMITTING: ensure that you have properly created your PR summary and followed the description template.
A note on changelogs. Changelogs should be player focused, meaning they should be understandable and applicable to your general player. keep it simple,
fix: fixed a bug with X when you Y
tweak: buffed X to do Y more damage.
Avoid coding lingo heavy changelogs and internal code changes that don't visibly affect player gameplay. These are all examples of what you shouldn't add:
tweak: added the NO_DROP flag to X item.
tweak: refactored DNA to be more CPU friendly
ShareX is a super useful tool for contributing as it allows you to make gifs to display your changes. you can download it, here
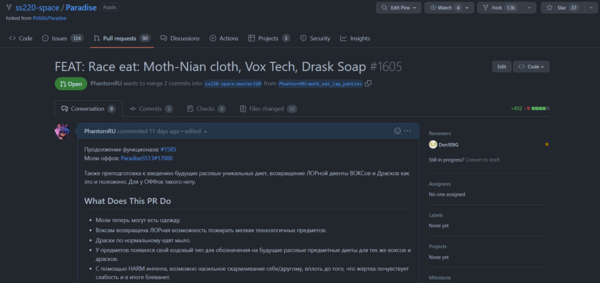
if all goes well, your PR should look like this:
If you want to add more commits to your PR, all you need to do is just push those commits to the branch.
Learning how to code
Now that you've set up everything there's just a little bit more to go. Now we're getting to the harder part, we have to learn logic and code. Don't fear however. There's a nifty guide on the github that will help you out!
STOP: At this point, if you're a beginner, you are good to go, everything below this is additional instructions for setting up other IDEs and advanced information
Setting up & Using TortoiseGit
- Go here: http://code.google.com/p/tortoisegit/wiki/Download
- Download the right TortoiseGit for your system.
- When installing, click OpenSSH rather than TortoisePLink
- Finish installing.
- RESTART YOUR COMPUTER THIS IS NOT A DRILL.
Forking Code
See this
Downloading the Code
- Find a place you don't mind the code sitting.
- Right click and choose Git Clone...
- The URL field should be filled with the URL of your Fork. If not, paste it in.
- Click Next and watch flying tortoises bring you your code.
Setting up TortoiseGit
- Right click on the folder that was created (usually called Paradise), and go to TortoiseGit and then click on Settings.
- Click on Remote under Git.
- There should be one thing on the list of remotes, with the name: origin.
- You're now adding the main repository as a source you can pull updates from.
- In the Remote box type in upstream.
- In the URL: box put: https://github.com/ss220-space/Paradise.git
- Click Add New/Save.
- Click Ok.
- Almost done!
Updating your Repository
- Updating your repo with the master should be done before trying anything.
- Right-click the folder your repo is in and select TortoiseGit then Pull.
- Click the radial button next to Remote and make sure upstream (or whatever you called it) is selected next to it.
- The remote branch should be set to master.
- Then click Ok. This will pull the latest changes from the master repo.
Making a Branch
Branching your repo is very important for organising your commits, you should have a different branch for each unrelated code change (e.g. if you wanted to make some new sprites for one item and change the properties of another these should be in seperate branches), as Pull requests work off branches rather than commits this will allow you to make a seperate Pull Request per change. Doing this streamlines the whole process and will save everyone a bunch of headaches.
- Right-click in your working folder. Then choose TortoiseGit, and Create Branch...
- Type in your new branch name
- (Optional) Tick Switch to new branch
- Press Okay and your new branch is created
Switching between Branches
- Right-click in your working folder. Then choose TortoiseGit, and Switch/Checkout...
- Choose your Branch then press Okay
Making a Commit
- A commit is confirmed change of the files in your repo, it's how you make changes permanently to the files in your repo, so try not to commit without making sure it works (though subsequent commits can fix it).
- As said before, you should use different branches to separate your commits/changes. Don't commit to master. It should be clean, so you can fall back on it if needed.
- To make your commits, you need to edit the files using BYOND's inbuilt editing tools. Make sure to follow coding standards when making your changes! When you're finished, right click the folder you're working with and choose Git Commit -> "[Your Branch Name]" (Example: Git Commit -> "My_First_Branch")
- You can then select only the files you want to be committed by ticking or unticking them. You should also write a detailed commit summary, detailing what happened in that commit.
- Click Ok and the commit will be committed to your local repo!
Making a Pull Request
- Right-click in your working folder. Then choose TortoiseGit, and Push...
- Set Local and Remote to the name of the branch you committed before. (e.g. My_First_Branch)
- Under Destination, set Remote: to origin.
- Click Ok. This'll upload your changes to your remote repo (the one on GitHub).
- Head to your GitHub repo e.g https://github.com/NAME/Paradise
- Click Pull Request at the top right.
- Fill out a summary and then create the pull request.
- You're done! In many cases there will be issues pointed out by other contributors, unfortunate merge conflicts, and other things that will require you to revisit your pull request.
- Optionally, view Clean Commits for a guide on cleaner commit logs, cleaner commits help maintainers review!
Clean commits / Squashing commits(Optional)
- Your commit logs are filthy, full of one or two line commits that fix an error that makes you look bad, and the commit is called "Whoops" or "oops"
- Navigate to your local version of the branch
- Ensure it is up to date with the remote
- Go to Show log
- Select all the commits associated with this change or PR
- Right click and choose Combine to one commit
- This will open up the standard commit interface for TortoiseGit, with the commit logs of the selected commits merged together
- Perform the normal routine for a commit
- Go to push your branch to the remote branch
- Ensure Force Overwrite Existing Branch (may discard changes) is selected to make sure the PR/Remote updates to contain just this squashed commit
Setting up & Using Github Desktop
- Go here: https://desktop.github.com/
- Download the Github Desktop for your system.
- Wait till the installer is done and you're done installing!
- Follow the steps to sign into github.
Forking Code
See this
Downloading the Code
- Open Github Desktop
- Select "File", "Clone repository.."
- Select your forked Paradise repository.
- Select a suitable path of where the repository will be cloned into.
- Press Clone and wait till it's done.
Updating your Repo
- Updating your repo with the master should be done before trying anything.
- Open Github Desktop and select your repository
- Click on the branch selection dropdown. And select your master
- Click on Choose a branch to merge into master
- Find the upstream/master branch and select it.
- Press the Merge upstream/master into master
Making a Branch
- Branching your repo is very important for organising your commits, you should have a different branch for each unrelated code change (e.g. if you wanted to make some new sprites for one item and change the properties of another these should be in seperate branches), as Pull requests work off branches rather than commits this will allow you to make a seperate Pull Request per change. Doing this streamlines the whole process and will save everyone a bunch of headaches.
- Open Github Desktop and select your repository
- Click on the branch dropdown and click New branch.
- Give it a suitable name and then click Create branch
Switching between branches
- Open Github Desktop and select your repository
- Click on the branch dropdown and select the branch you want to switch to.
- If you have open changes then it might fail. Either stash, commit or discard the open changes and try again.
Making a Commit
- A commit is confirmed change of the files in your repo, it's how you make changes permanently to the files in your repo, so try not to commit without making sure it works (though subsequent commits can fix it).
- As said before, you should use different branches to separate your commits/changes. Don't commit to master. It should be clean, so you can fall back on it if needed.
- To make your commits, you need to edit the files using BYOND's inbuilt editing tools or any other editing tool such as Visual Studio Code. Make sure to follow coding standards when making your changes!
- Open Github Desktop and select your repository
- Check the changes once more over in the application.
- Give in the commit message
- Optional, give in a Description
- Press Commit to BRANCH NAME
Making a Pull Request
- Open Github Desktop and select your repository
- Press the Public branch button
- Head to your GitHub repo e.g https://github.com/NAME/Paradise
- Click Pull Request at the top right.
- Fill out a summary and then create the pull request.
- You're done! In many cases there will be issues pointed out by other contributors, unfortunate merge conflicts, and other things that will require you to revisit your pull request.
Learning how to use TGUI
If you're still brand new, it's recommended that you pick up DM more before moving on to TGUI. All of our user interfaces (except OOC stuff like admin panels) are made using TGUI, or need to be converted to TGUI as some point. (This is where you come in!)
TGUI uses InfernoJS(based off of reactJS) which is an extension to javascript. It can be daunting to learn because it's in a completely different language but don't fear! There's plenty of guides you can follow.
Как делать предложения правок на GutHub
Файл:GitHub как делать ревью 1.png Файл:GitHub как делать ревью 2.png
Guides
TGUI is simple but hard to understand to someone unfamiliar to it. READ THESE GUIDES.
Make sure to Read these in order
- A re-introduction to JavaScript
- Guide to using ReactJS <- We do not actually use react but this is super helpful
- Brief rundown of InfernoJS
- TGUI Tutorials and Examples
| Как внести свой вклад? | |
|---|---|
| Общее | Руководство по разработке |
| Сервер | Настройка базы данных, Запуск локального сервера |
| Код | Структура кода SS13, SS13 для опытных программистов, Форматирование текста, Как делать перевод игры |
| Маппинг | Руководство по маппингу |
| Спрайтинг | Руководство по спрайтингу |
| Вики | Руководство по редактированию вики |


