Руководство по редактированию вики
Hello and welcome to Paradise Station's Wiki. You are likely a prospective wiki contributor wondering how exactly you can contribute to our server wiki. Before making significant changes, contributors should read through our Wiki's Rules. The Guide to Wiki Editing seeks to outline how our wiki is structured, how one can make edits on our wiki, where contributors should be focusing their efforts, how to make an effective and useful edit, and finally how to begin writing quality articles.
Правила вики
Несоблюдение нижеуказанных пунктов может привести к блокировке на всех википедиях проекта SS220, поэтому если вы хотите вносить вклад, то потратьте несколько минут на их прочтение. Данные правила возникли, как необходимая мера, против "рофло-перевода", машинного перевода, а также жалоб на переводы, поэтому добросовестных редакторов они будут касаться минимально.
Политика по переводу
- Перевод (в отличие от редактирования) должен соответствовать по содержанию оригинальной странице билда Padarise, Sierra, TG, TGMC за исключением случаев, когда информация с оригинальной страницы не соответствует реалиям билда, например при разнице обновлений.
- Адаптированный перевод, т.е. добавление собственного текста, допускается на страницах-руководствах. Для иных страниц требуется оповещение главного редактора. (BOTpurple#7181 в дискорде)
- При переводе должны использоваться общепринятые расшифровки и аббревиатуры, отличающиеся от билда к билду. Если при переводе вам встретилась аббревиатура, которая отсутствует на данной странице (для Paradise, для TG, для TGMC) то сообщите об этом в дискорд-канал #wiki-mistakes.
- Рофло-перевод, а также машинный перевод, т.е. прогонка текста через онлайн переводчик без последующего исправления, запрещены и презираются даже на незаконченных страницах.
- Именные вставки, т.е. выделение определенного человека в тексте по различным причинам, запрещено на любых страницах и руководствах википедии, за исключением Песни, Образцы документов и подобных страниц на других вики.
- Излишнее использование зачёркиваний, жирного текста, увеличенного текста, курсива и т.д. не приветствуется, если соответствующего нет на оригинальной странице.
Политика по редактированию
- Описание изменений должны содержать в себе компактную, но подробную информацию о редактировании.
- В случае внесения малого вклада на страницу, также требуется заполнение описания изменений.
- Переименовывание страниц википедии запрещено, кроме случаев, когда название не переведено или кардинально отличается от содержания страницы.
Что такое вики и зачем мы над ней работаем?
Проект SS220 один из самых больших по меркам SS13 из-за чего он привлекает много новых игроков. Помимо новых игроков также существуют разительные отличия в билдах (a.k.a. версиях) серверов SS13. Википедии создаются и дополняются игроками для таких же игроков, чтобы минимизировать влияние опыта на РП процесс или саму игру. Каждая вики содержит в себе множество руководств и документаций, которые объясняют различные аспекты и механики в читаемом и понятном виде. Мало того, что вики делает эту информацию доступной, так в ней еще и проходит процесс организации, помогающий игрокам в поиске того, что им требуется. Если информация доступна в игре, то на википедии он должен узнать больше.
Как говорилось ранее - википедия редактируется такими же игроками, т.е. отсутствует любая форма автоматизации, поэтому для поддержания вики в актуальном состоянии требуются не разговоры об этом в дискорд-каналах, а реальные действия по её улучшению. SS13 имеет в себе огромное количество контента, и лишь самая малая часть игроков по-настоящему разбирается в нём. Именно из-за этого хорошая википедия должна дополняться и изменяться как можно большим количеством игроков. Всем тем, кому наплевать на развитие википедии можно пожелать лишь быть терпеливым по отношению к скорости её обновления. Пока одни лишь говорят о проблемах - другие делают реальные действия по их исправлению.
Начать вносить свой вклад может совершенно любой, кто зарегистрируется на нашей википедии и найдёт интересующую его страницу. Для этого не требуется никаких разрешений, а только знания игровых механик и правил вики. Любая не закрытая от редактирования защитой страница может быть улучшена.
Внесение изменений
В любое время вики может быть изменена, процесс этого называется редактированием. Лишь некоторые страницы обладают защитой от редактирования как от начинающих редакторов, так и от верифицированных. Всё остальное может обновляться и изменяться вами по вашему желанию и с сохранением общей стилистики.
Если вас волнует, действительно ли ваш вклад внесся на вики - вы можете посмотреть данную страницу. В ней перечисляются все изменения от самого создания, до последнего редактирования. Данная страница также хороша для отслеживания и проверки изменений других редакторов.
Основные направления
Это краткий список вводной информации для начала редактирования.
Если вы в чём-то сомневаетесь - не стесняйтесь спрашивать об этом в #wiki канале дискорда
Общий вики-этикет и принятые нормы
- Не стоит писать каждое слово с заглавной буквы, т.к. по нормам русского языка - это допустимо лишь в начале предложения и для имен собственных.
- Следовательно это распространяется и на заголовки, и на названия страниц.
- Исключением также не являются ссылки, которые часто внедряются внутрь предложения.
- Не стоит злоупотреблять ссылками.
- Для навигации хватает лишь ссылок при первом упоминании чего-либо на странице, в остальной же её части достаточно лишь текста.
- Для навигации внутри википедии существуют "интервики" ссылки, которые оформляются в двойные квадратные скобки, поэтому не стоит использовать внешние ссылки для внутренней навигации. (В данном руководстве используются внешние ссылки, из-за удобства переноса на другие википедии)
- Если вы изменили название страницы, то обязательно нажмите на "Ссылки сюда" в боковой панели википедии и убедитесь, что вы не создали двойные перенаправления.
- Описание изменений должно содержать информацию о редактировании. Это упрощает работу по улучшению вики.
- Малые изменения включают в себя от самого малого, по типу изменения букв, пунктуации, грамматики, до более крупного, такого как изменение содержания раздела. Если вы редактируете страницу в целом, или раздел довольно обширный, то не стоит нажимать кнопку "Малое изменение".
- На википедии допускается лишь русский язык, желательно с соблюдением всех норм.
- Английский текст используется, как дополнительный, в качестве указания на объект в целях упрощения его поиска.
- Существуют некоторые слова, которые не принято переводить, например Nanotrasen.
- Другие слова требуют такого же перевода, как на остальной википедии, т.е. не надо называть тенеморфов тенелингами.
- Названия новых изображений, которые вы загружаете на википедию, должны быть на латинице и соответствовать содержанию, т.е. не надо называть банан - блюспейс кристаллом.
- Код страницы желательно держать в общей стилистике, т.е. на латинице. Это подразумевает использование "px" вместо "пкс", "File:" вместо "Файл:" и т.д.
- Воздержитесь от излишнего юмора/выделения
- Википедия проекта SS220 старается находиться в более-менее серьезном виде. Остроумная одиночная шутка может оказаться хорошим дополнением к странице, но постоянный зачеркнутый юмор - нет.
- Выделения и изменение размера текста должно оставаться для заголовков, заметок или важной информации. Не используйте выделения без необходимости.
Создание новой страницы
По мере добавления нового контента в игру может появиться что-то достаточно уникальное, оправдывающее наличие собственной вики-страницы. Перед созданием настоящей страницы - вы можете отредактировать собственную страницу пользователя, которая является некой "песочницей" для вас.
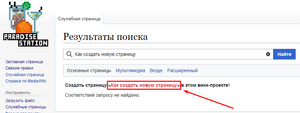
Существует два метода создания страницы:
- Если в тексте присутствует ссылка красного цвета, вы можете нажать на неё и у вас появится страница с предложением о её создании.
- Напишите название будущей страницы в строке поиска в правом-верхнем углу и вам предложит создать страницу, если её еще не существует.
Если вы создали свою страницу пользователя, нажав на свой никнейм в правом-верхнем углу, то вы можете писать там почти всё что угодно. Старайтесь делать страницу и её название в общей стилистике. В самом начале вашей страницы лучше всего поместить данный шаблон "{{Stub}}", чтобы указать на новизну этой страницы остальным редакторам. После того, как вы заполнили содержание - напишите об этом в "Описание изменений", а также причину по которой вы думаете, что нужна новая страница - затем нажмите кнопку "Записать страницу".
Политика по созданию страниц:
- Создание новых страниц допускается для нового контента. Например, сложная механика, требующая отдельного выделения или новый антагонист.
- Если новая страница была создана, то добавьте ссылки на неё, чтобы её могли найти. Например, на общей странице руководств или страницах профессий.
- Не создавайте новые страницы для собственных нужд. Это увеличивает количество мусорных статей, к которым можно перейти через функцию "Случайная страница".
- Если вам нужно что-то протестировать, то используйте свою страницу пользователя. Для уточнения: если ваше имя пользователя IvanIvanov, то ваша страница будет называться Участник:IvanIvanov.
- Страницы других пользователей не являются объектом редактирования, поэтому не вмешивайтесь туда, если вас не просят.
- Если вам нужно что-то протестировать, то используйте свою страницу пользователя. Для уточнения: если ваше имя пользователя IvanIvanov, то ваша страница будет называться Участник:IvanIvanov.
Редактирование статьи
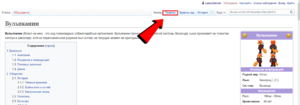
Так как страницы вики требуют регулярные исправления, чтобы оставаться актуальными и иметь всю возможную полезную информацию, важно понимать не только как их создавать, но и как редактировать. Чтобы начать редактирование страницы, редактор должен находиться на нужной странице и нажать "Править" или "Править код" (между кнопками "Читать" и "История" сверху).
Описание вкладки редактирования
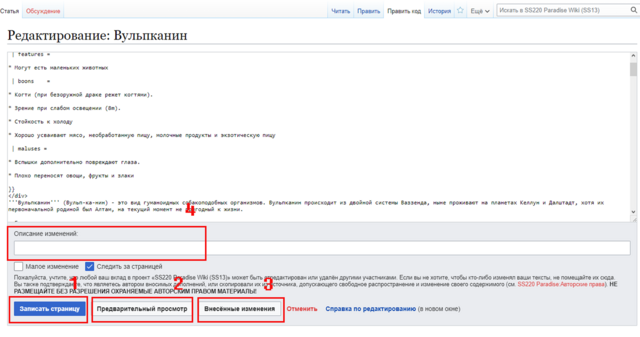
- 1: "Записать страницу" сохраняет ваш текущий вариант статьи как основной. Вы можете откатить это изменение через кнопку "История", а затем "отменить".
- 2: "Предварительный просмотр" показывает вам как будет выглядеть страница со всеми вашими изменениями. Следует регулярно нажимать её перед записью даже опытным редакторам.
- 3: "Внесенные изменения" упростит поиск ошибок в вашем тексте, так как показывает различия с прошлой версии страницы.
- 4: "Описание изменений" будет показываться в истории страницы, поэтому потратьте немного времени на заполнение. Описание не должно быть ужасно подробным, а скорее ёмким и ясным.
Теперь ты можешь редактировать, не волнуйся, ничего не сохранится пока ты нажмёшь на "Записать страницу". Если это твоя пользовательская страница, то меняй её как хочешь. Если это страница об игре, следи за тем, чтобы сохранить качество страницы или даже улучшить его. Когда ты сделаешь всё что хотел, опиши свои изменения и без страха нажимай записать. Твоя страница будет сохранена.
Загрузка файлов
Как добавить файл или картинку на страницу будет дальше в руководстве, этот раздел концентрируется на том случае, когда файла ещё нету в базе данных вики и его нужно загрузить. Есть несколько способов загрузить новый файл:
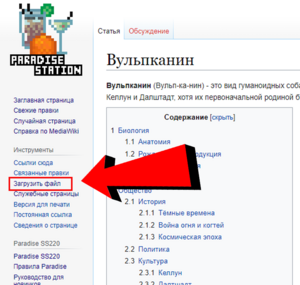
- Нажмите на красную ссылку файла.
- Нажмите на "Загрузить файл" в правой части экрана под логотипом в разделе Инструменты.
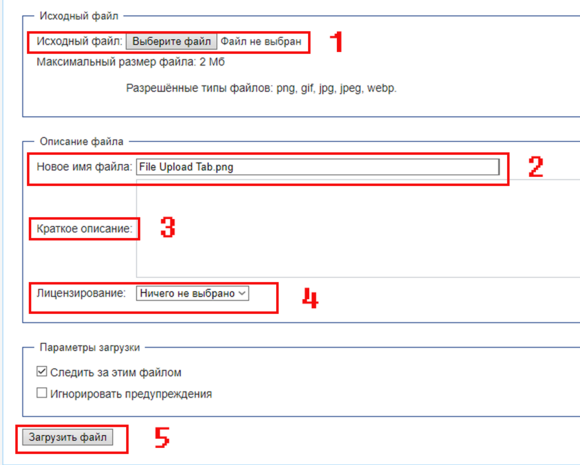
Описание вкладки загрузки файлов:
- 1: Нажмите на "Выберите файл", что откроет проводник файлов на вашем компьютере и вы сможете выбрать файл для загрузки.
- 2: "Новое имя файла" позволяет изменить название файла в системе на другое, так обычно проще делать операции с этим файлом на вики. ("File:" в начало добавляется автоматически),в конце должен стоять тип файла, и он должен совпадать с оригинальным типом этого файла. Имя файла должно быть на латинице.
- 3: "Краткое описание", кратенькое описание файла для тех, кто решит его открыть, также может быть полезно для добавления ключевых слов, чтобы в будущем было проще его найти.
- 4: "Лицензирование", вы должны выбрать лицензию прежде чем загружать файл (прочитайте указания немного ниже).
- 5: "Загрузить файл" загружает файл в базу данных вики, процесс автоматически останавливается если: А) вы не правильно заполнили имя файла или не указали файл, Б) тип файла и тип в его названии не совпадают, В) вы пытаетесь загрузить копию уже существующего файла (не стоит полагаться на это), Д) случилось что-то ужасное, спросите помощи.
Лицензирование изображения
- Вам необходимо выбрать правильную лицензию для вашего файла.
- CC-BY-SA для игровых файлов.
- CC-BY-NC-SA для игровых файлов в goon folder.
- GFDL 1.3+ для файлов использующихся только на вики.
Загрузка новой картинки в уже существующий файл
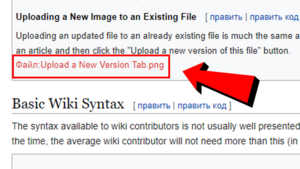
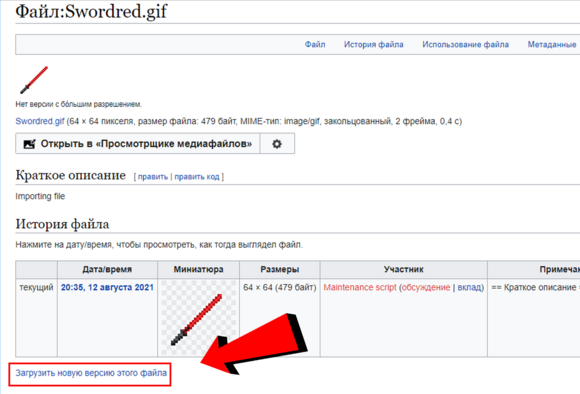
Не много чем отличается от обычной загрузки файла, но путь к результату немного другой. Вам нужно зайти на страницу файла, которого вы хотите обновить или заменить, можете использовать как поисковую строку так и ссылку на неё на какой-нибудь странице, а потом нажмите на "Upload a new version of this file".
Базовый синтаксис для вики
Форматирование текста
Стандартный текст сам по себе очень скучный и сложен для чтения, поэтому важно грамотно использовать форматирование, чтобы сделать свою страницу лаконичнее.
| Тип | Итог | Mediwiki | HTML |
|---|---|---|---|
| Полужирный | Используется в основном для выделения важных слов. Полужирный текст |
'''Полужирный текст''' |
<b>Полужирный текст</b> |
| Курсив | Используется для выделения определенных слов или цитирования. Текст выделен курсивом |
''Текст выделен курсивом'' |
<i>Текст выделен курсивом</i> |
| Заголовки | Используется чтобы упорядочить вашу страницу.
Level 2 Level 3 Level 4 Level 5 Level 6 |
==Уровень 2== ===Уровень 3=== ====Уровень 4==== =====Уровень 5===== ======Уровень 6 ====== |
|
| Paragraphs | You can designate sections of text as paragraphs which will for a linebreak before and after that section, you can also apply some more advanced formatting through Styles with it. <p> This is a paragraph of text! </p> |
This is a paragraph of text! | |
| Bullet Lists | This is how you create bullet lists
*Item 1 * Item 2 ** Item 2.1 ** Item 2.2 * Item 3 ** Item 3.1 *:- Definition |
| |
| Numbered Lists | This is how you create numbered lists
#Item 1 # Item 2 ## Item 2.1 ## Item 2.2 # Item 3 ## Item 3.1 |
| |
| Preformatted Text | Use this to preformat text with a certain, this will alos allow you to write anything within the pre blocks without the wiki recognizing it as text formatting.
<pre>This text is preformatted to be the default font and style, <b>Things aren't bolded</b> or <i>Italicized</i>!!!</pre> |
This text is preformatted to be the default font and style, <b>Things aren't bolded</b> or <i>Italicized</i>!!! | |
| Comments | Use this to leave important notes/messages to people editing the page. Comments do not show up when you view the wiki page and are only visible in the page editor.
<!--This is a comment, to whoever is reading this --> The Fitness Gram Pacer Test is a multi-stage aerobic exercise... |
The Fitness Gram Pacer Test is a multi-stage aerobic exercise... | |
| Nowiki | The nowiki block makes it so that any formatting within the block is ignore and is instead displayed as regular text. <nowiki><b>This is bold!<b> this is a burger: [[File:Burger.png]]</nowiki> |
<b>This is bold!<b> this is a burger: [[File:Burger.png]] |
References
It is very important the articles link to each other so we have a web of information. In order to do this, we can reference articles and link keywords to those articles.
The most obvious way to do this is by typing [[Article Name]]
For example, you could link to Space Law by typing[[Space Law]]You can also link the article and change the link text. If you wanted to still link to space law but instead have the link be Legal Suggestions then you would have to use the syntax below. The two parameters for images is the Page Name and the Link Text --> [[Page Name|Link Text]]
[[Space Law|Legal Suggestions]]
Referencing Nuances
As a general note, you should always add spaces after references as it will include any characters that are next to it. So if you write [[Space Law]]textextext It will output as Space Lawtextextext.
If you wanted to do something like SMES's where you have characters directly next to the link then you would have to add the <nowiki /> tag to it --> [[SMES]]<nowiki />'s
If you want to link to an image rather than embedding it you will need to add a ':' colon before the name. For example, I can reference File:Burger.png without the image embedding itself by doing:[[:File:Burger.png]]
If you want to link to something outside of the Main: Namespace (if you're not sure what a namespace is, go here, but for now all you need to know is that all general users will be reading are in the Main Namespace) you will have to specify which namespace the article is in before you link it.
For example if I wanted to link to my user page:User:Sirryan2002 I cannot just use [[Sirryan2002]] because it will automatically default to the main namespace -> [[Main:Sirryan2002]] which does not exist. I will have to instead specify which name space I'm searching in. For the user's name space I will specify User[[User:Sirryan2002]]
Referencing Subsections
Sometimes you don't want to just link to an article, you want to link to a specific point in that article.
By adding a hashtag '#' to the end of a page name in your link you can specify where you want to go in that article. You can do this for any subsection in an article.
If I wanted to link this to Crime Codes References on the Space Law page. All I would have to do is specify it like so:[[Space Law#Crime Codes Quick Reference]]If the area you're referencing is in the article where the link is you can shorten the syntax. For example if I was on the Space Law page and I wanted to link a certain word to a subsection/anchor all I would have to do is use a '#' and write the subsection name:
[[#Crime Codes Quick Reference]]
Anchors
An Anchor is a defined place within in a page that you can link people to. They work much like headings where you can link people to them:[[Page Name#Anchor Name]].Infact, all headings have anchors attached to them! On our wiki we have Template:Anchor which allows us to create anchors extremely easily. What you will need to do is find the area you want someone to be taken to and place the anchor directly next to it via
{{Anchor|Anchor_Name}}
If I wanted to create an anchor right -> here <- all I would have to do is this: If I wanted to create an anchor right -> here{{Anchor|AnchorExampleSpot}} <-
now if you click on #AnchorExampleSpot it should take you directly to the anchor.
External References
Occasionally you will need to reference a link outside of the Wiki. This is often seen in articles that are guides to spritiing/code stuff or in our rule pages. Bottom line, you will rarely ever have to use an external reference and it should be avoided. If you ever do need to add an external link, it is a lot like referencing an internal article.
You will needs to use one opening square bracket '''[''' and one closing square bracket ''']''' Inbetween you will need to put the link, add a space after the link and define the text for the link
[https://www.paradisestation.org/ Paradise]
This outputs: Paradise
Images
Images are extremely important for our wiki, without them people wouldn't know what icons/mobs would look like or get a visual representation of what they're supposed to do.
In order to use an image you must utilize the [[File:]] synax.
For example, if you want to use Burger.png: ![]() then you must specify [[File:Burger.png]]. This will make Burger.png appear wherever you declare this.
then you must specify [[File:Burger.png]]. This will make Burger.png appear wherever you declare this.
However, in order to make images useful to us, we need to format that in a way that is easy to understand and see. We can add parameters to our image by utilizing the pipe '|' character. If you want your image to a certain size and make it link to another page you can specify it as [[File:Burger.png|64px|link=Space Law]]. There's a ton of parameters you can use but the most important ones are listed below.
Tables
Put data and shit into tables cause it helps readers digest information more betterer'
A wikitable always has to be wrapped by curly brackets and a pipe bracket
{|
All the content goes here
|}
Below from left to right is Table Syntax, an example table in final form, and example code for a table.
| Syntax | What it does |
|---|---|
| {| | Start a table - required |
| |} | End a table - required |
| |+ | Add a definition/title to the table |
| |- | Starts a new row |
| ! | Creates a Header Cell |
| | | creates a new cell |
| Header Cell | Header Cell | Header Cell |
|---|---|---|
| Header Cell | Cell | Cell |
| Header Cell | Cell | Cell |
| Header Cell | Cell | Cell |
| Header Cell | Cell | Cell |
| Header Cell | Cell | Cell |
| Header Cell | Cell | Cell |
{|class="wikitable"
|-
! Header Cell
! Header Cell
! Header Cell
|-
! Header Cell
| Cell
| Cell
|}
Table Classes
You should never go with the default table setup because it has no border or lines to break up cells. In order to give our tables fancy UI we have to declare what class it is.
We always do this at the beginning directly after the table start syntax The wikitable class gives our tables borders/outlines with grey backgrounds for header cells
| Header Cell | Header Cell | Header Cell |
|---|---|---|
| Header Cell | Cell | Cell |
{|class="wikitable"
|-
! Header Cell
! Header Cell
! Header Cell
|-
! Header Cell
| Cell
| Cell
|}
The mw-collapsible class makes it so you can collapse the table(have to include wikitable class)
| Header Cell | Header Cell | Header Cell |
|---|---|---|
| Header Cell | Cell | Cell |
{|class="wikitable mw-collapsible"
|-
! Header Cell
! Header Cell
! Header Cell
|-
! Header Cell
| Cell
| Cell
|}
The mw-collapsed starts a table with a mw-collapsible class in the collapsed state.
| Header Cell | Header Cell | Header Cell |
|---|---|---|
| Header Cell | Cell | Cell |
{|class="wikitable mw-collapsible mw-collapsed"
|-
! Header Cell
! Header Cell
! Header Cell
|-
! Header Cell
| Cell
| Cell
|}
The Sortable class allows you to make your columns sortable alphabetically, numerically, or by date. Additionally, by defining a row with class="unsortable" you can make it so that row isn't sortable.
| Alphabetic | Numeric | Date | Unsortable |
|---|---|---|---|
| d | 20 | 2008-11-24 | This |
| b | 8 | 2004-03-01 | column |
| a | 6 | 1979-07-23 | cannot |
| c | 4.2 | 1492-12-08 | be |
| e | 0 | 1601-08-13 | sorted. |
{| class="wikitable sortable"
|-
! Alphabetic
! Numeric
! Date
! class="unsortable" | Unsortable
|-
| d || 20 || 2008-11-24 || This
|-
| b || 8 || 2004-03-01 || column
|-
| a || 6 || 1979-07-23 || cannot
|-
| c || 4.2 || 1492-12-08 || be
|-
| e || 0 || 1601-08-13 || sorted.
|}
Cell Size Formatting
You can define the size of a cell by using colspan and rowspan.
| col1 | col2 | col3 | col4 |
|---|---|---|---|
| row1 | A | C | |
| row2 | AA | BB | CC |
| row3 | AAA | BBB | CCC |
| row4 | AAAA | CCCC | |
{| class="wikitable" style="text-align: center;"
!col1
!col2
!col3
!col4
|-
!row1
| colspan="2" | A
|C
|-
!row2
|AA
|BB
|CC
|-
!row3
|AAA
| rowspan="2" | BBB
|CCC
|-
!row4
|AAAA
|CCCC
|}
Table Style
Without defining the style of your table, it will look rather barebones. Most pages on this wiki have a color theme to them so it's important to know how to do this.
Whenever you're defining the style (aka how it looks) of a table you will need to declare it using the style="" syntax.
However, what do you put inbetween those quotations marks? Well the answer isn't the same for all the style options you have with HTML. For example, if you want to make background color of the table CadetBlue you would have to do this:
{|class="wikitable" style="background-color:CadetBlue;"
|-
| Cell
| Cell
| Cell
|-
! Header Cell
| Cell
| Cell
|}
Notice how the there is a semi-colon ';' after it. You must use semicolons to separate each attribute you use and to end the string.
For more information on what attributes there are for styling go Here.
Depending on what you're trying to do, you can style different parts of a table. To style the entire table, your style will have to go directly after where you define the class of the table:
{|class="wikitable" style="text-align:justify;"
|-
| Cell
| Cell
| Cell
|-
! Header Cell
| Cell
| Cell
|}
To Style Individual Cells you will need to define the style of the cell and then use the '|' character after which you can then write the content that would go into the cell. Additionally, you can do this to header cells "!" in the sameway.
{|class="wikitable"
|-
! style="color:blue; text-weight:bold;" | This Header Cell is Styled!
| Cell
| Cell
|-
! Header Cell
| Cell
| style="text-align:left" | This Cell is also Styled!
|}
To Style Rows you will need to define the style after you declare the row with 'the |-' character
{|class="wikitable"
|-
| Cell
| Cell
| Cell
|- style="text-weight:bold;"
! Bold Header Cell
| Bold Cell
| bold Cell
|}
Wiki Organization
As stated previously, making information accessible and easy to find is just as important (if not more sometimes) than providing as much information to the read. Our Wiki is organized in a very specific way.
Page Type
All of our wiki pages can be broken down into 6 distinct pages:
- Location Page: A page that shows the image of a single station location and lists out pertinent information such as a short description of the location, its content, security level, access, and a few other items.
- Job Page: A Page that describes a job/role and the jobs purpose as well as how to fulfill its responsibilities in-game. These pages may also serve as mini-guides to the role and provide specific information detailing how to do certain role-unique actions.
- Guide Pages: A page that serves to teach players about a group of related mechanics and features. These pages explain how to obtain certain items, perform certain actions, and overall fully utilize all features that pertain to the subject matter.
- Item Pages: A page that serves to document all available game items/objects/structures related to its theme. Will generally list the object, its sprite, its name, and a light description of the object detailing what actions the object can perform and linking it to any other pertinent guides or roles.
- Lore Pages: A page that details the lore for our server.
- Navigation Pages: A page that has the purpose for directing the reader to articles containing knowledge that the reader is looking for. Pages like these may give a surface level explanation of a macro concept such as a specific department as a whole or overlying mechanic such as roles.
Having a wiki with pages numbering in the 3 digits poses a unique issue: even if all relevant and necessary info is present, how does a reader efficiently access it? The Mediawiki search engine is from from enough. The simplest answer is to both interconnect pages to allow for easy jumping article-to-article as well as establishing navigation pages that serve as a phone-book for all relevant articles of a macro topic (think an overlying topic such a "Engineering" or "Antagonist").
While this is a particularly complex topic to break down, its important for contributors to know how their article needs to slot into the larger wiki structure so that the article they spent so much time putting into is actually accessible and discoverable. A good article will make sure it is connected to other articles in the following ways.
Inter-Article Linking
It does not make sense for a reader to jump to a navigation page when they need to find an article closely (or even tangentially) related to the article they are currently reading. There are a few methods in which our wiki allows easy jumping between similar articles.
- Interwiki Links: These are the bread and butter of the wiki represented as
[[Space Law]]blue links on wiki pages, they allow the reader to jump to a referenced article. This is very important for when an article references a term or feature that it does not need to define within the article, for example if the article talked about the Captain or referencing a specific Random Event. - Sidebars: Sidebars are by far the quickest way to navigate through a macro topic. They do not necessarily link articles of similar page type but do link together pages that cover similar topics. For example: the engineering sidebar is visible on and links together each of these page Station Engineer, Guide to Construction, and Atmospherics because they are all "Engineering" focused articles (and are very useful for anyone looking for general information on engineering).
- Footers Infoboxes: Footer infoboxes serve to link together all pages of similar Page Type. That is, at the bottom of every job page is a large infobox linking all job articles. Unlike sidebars, these do not stick to a particular theme.
These three inter-article linking methods work together in perfect tandem. If implemented well and correctly, a reader can go from one article to another "related" article in a single-jump.
What about articles that are not "related?" It would be inefficient and useless to the reader if every single article was linked on every single page. It's just too much links and you run into the same issue of the reader not being able to find the information they want. The solution to this is a phone-book-esque page called a navigation page. Navigation pages serve to coalesce all articles of a particular theme under one page. They are very similar to sidebars in what they offer in terms of linked articles (with a little more information), however, they allow for jumping between other navigation pages. That means, instead of jumping from an article to another "related" article, the reader can now jump from one macro topic to another. For example, one can use the Engineering Portal to not only find articles related to "engineering" but also jump to other navigation pages covering completely different macro topics such as the Antagonist Portal or Security Portal.
Wiki Templates
Wiki templates are how contributors significantly count down on wikicode that is replicated across multiple page. For example, most headers, sidebars, maintenance headers, and otherwise standardized page UI elements are stored in templates. A template is exactly as the word defines it, predefined code that can be easily inserted into any wikipage with a simple template call. For the general wiki contributor, its only important to understand how to use these templates as well as what templates are available to use and when to use them!
How to Use
Disclaimer: It is important that you read the Template Documentation so you know what parameters it takes!
In order to call a template you must utilize double curly brackets: {{ and }} Inbetween those brackets you will need to put the name of the template.
For example, if I wanted to place a Work in Progress Template(see Template:Wip) over an article I'm working on I would call the template by its name in curly brackets. Additionally I've checked and seen that it takes one variable called assign. What I will need to now do is not only call the template but also give it parameter values. By using the pipe '|'character to separate the template name and parameters you can assign values to those variables.
{{Wip|assign=Sirryan2002}}
While it would be easy to copy over the code from Template:Wip, this is a much faster, easier, and shorter method of doing that. Lets look at another case involving manyvariables or parameters
In this case, we're calling the job-guides template! We can define the parameters by opening up the Template Call and using some line identifiers like so:
{{JobGuides
 | colour     = #CCAE18
 | department = Burger
 | image      = Burger.png
 | roleheader = Burger Jobs
 | roleguides = Burger Guides
}}
Doing this will fill in some of those missing parameters, and we'll get the following result:
As a rule of thumb, it's always a good idea to look at another page that has the template to see how it's being utilized. This not only cuts down on time, it will usually tell you what those other hidden parameters are!
Types
Maintenance Templates
These templates are all headers that indicate that there is something on the page that requires action from wiki contributors to either fix, create, or update.
Needs Revision:
- Most Common Template, indicates to contributors that something on the page should be revised
- Most useful for indicating incorrect information, improper formatting, missing information, or other article mistakes
{{Needsrevision|reason=This page is missing information about sleepers/blobbernauts/lavaland tendrils etc}}
Причина: This page is missing information about sleepers/blobbernauts/lavaland tendrils etc
Work In Progress:
- Indicates to contributors and readers that an article is incomplete and is in the process of being finished
- Most useful for newer pages or rewrites due to large reworks/refactors
{{Wip|assign=Yourmom}}
Stub
- Indicates to contributors that readers/contributors want this page but it still needs to be filled out
- Useful to mark out pages for information that doesn't exist on the wiki but should
{{Stub}}
Rewrite:
- Indicates to contributors that this page should be completely rewritten either from the ground up or have each section revised/vetted.
- Most useful for old pages that have core formatting and writing style issue that aren't worth the effort to rework with small edits at a time.
{{Rewrite|reason=There is no actual information structure to this page, most sections encourage actions that are against server rules or are against our rules regarding wiki content}}
Missing Images:
- Indicates to contributors this page is missing images that are references and another contributor should upload them.
- Useful for contributors who aren't well versed with getting images from the code but are capable of creating articles that need images to supplement them.
{{Missing Images|Missing=The Lavaland loot table is missing images for all cult and magic related items.}}
Slated For Removal:
- Used for both files and articles, indicates that a page should be deleted.
- This template should be used sparingly and only for article with titles that are not useful redirects and/or should not be on the wiki.
- This template should be used for file pages that will never be utilized on the wiki in the near future or duplicate files.
{{Slated for removal|reason="Duplicate File" or "Why the fuck does this page exist? Who thought 'Crab Cult" is even a remotely useful article name?"}}
Причина: Устаревший контент
Outdated File:
- Used for files that contain images of outdated items such sprites, locations, or object that had changes made and now look different.
{{Outdated File|reason=Theta has moved from singularity to tesla equipment}}
Low Quality:
- Used for just about any reason other than "outdated" for files. Can be that the image is low resolution, has stray marks, was capture incorrectly, or downright contains incorrect information/content.
{{Low Quality|reason=Non-SDMM In-game screenshot preffered}}
Page Templates
These are the standard templates we use for our content articles! There's too many to list out so they are just listed.
- Headers
- {{JobPageHeader}}
- {{Location}}
- {{Obsolete}} - Indicates a page that contains content that has been completely removed from the game
- {{Out of Rotation}} - Indicates a page that contains game modes, ruins, events that don't spawn naturally (does not include admin-spawn only items/roles)
- {{{{NonIC}}}} - Indicates a page that contains content that players should not know ICly (reserved for dsquad and SST only)
- Footers
- {{JobsTable}} - List of all job pages
- {{Locations}} - List of all location pages
- {{Archive}} - List of all obsolete pages


