Руководство по разработке: различия между версиями
imported>NeonNik2245 м дополнение |
imported>Ohar м Исправил категорию |
||
| Строка 416: | Строка 416: | ||
{{Contribution Guides}} | {{Contribution Guides}} | ||
[[ | [[Категория:Руководства]] | ||
Версия от 10:04, 30 мая 2022
Это руководство предназначено для обучения новичков успешной работе с Paracode.
Пожалуйста, прочитайте гайд полностью от верха до низа.
Шаблон:Toc right
Чтобы максимально удобно и эффективно вносить изменения в код вам будут нужны эти три вещи:
- Текстовый редактор (VSCode крайне рекомендован)
- Github
- Сам BYOND редактор - Dream Maker
Быстрая навигация
Я абсолютный новичок
Мне нужно установить\настроить VS Code
Мне нужно настроить Git/Github
Я загрузил всё вышеперечисленное, как мне получить и настроить репозиторий?
Ок, у меня есть конфигурация репозитория, как мне менять содержимое?(Pull Requests)
Я хочу использовать TortoiseGit (Не для новичков)
Я хочу использовать Github Desktop (Дружелюбно к новичкам)
Ок, я завершил настройку своих изменений! Как мне закодировать/внести вклад на сервер?
Я внёс свой вклад! Стоп, как вообще использовать TGUI?
Я абсолютный новичок
Итак, вы в ситуации, с которой сталкивался каждый разработчик paradise. Как мне научиться работать и привносить свой вклад? Как мне добавить свой код к коду сервера? Что ж, тут несколько шагов, как начать работу и загрузить ресурсы.
Просто прочитайте этот гайд пока не дойдёте до конца. Пока вы следуете этим шагам всё должно быть в порядке! (нужен файл)
Устанавливаем и настраиваем Visual Studio Code
Установка VScode
- Идём на вебсайт VSCode's: https://code.visualstudio.com/
- Загружаем и устанавливаем актуальную версию.
Установка VSCode плагинов
Когда вы откроете Paradise репозиторий, у вас появится уведомление об установке некоторых рекомендованных дополнений, они просто устанавливаются по данному алгоритму
- Перейдите на вебсайт VScode и загрузите плагины
- Нажатие "Установка" перенаправит вас в VSCode где вы можете установить и перезагрузить его
Вот пара плагинов, которые крайне полезны для кодинга в DM
Установка и настройка Github
Эта часть про установку и настройку Git и созданию Github аккаунта.
Установка Git Bash
- Переходим: http://git-scm.com/downloads
- Загружаем Windows Git программу, подходящую вашей операционной системе (оно должно будет выглядеть как "Git-2.18.0-64-bit.exe")
- Устанавливаем его и оставляем всё в стандартном режиме (просто пропускаем всё кнопкой next).
- Дожидаемся конца установки.
- Готово!
Регистрируемся в Git
(Пропустите, если у вас уже есть аккаунт) Вам нужен будет аккаунт, чтобы привносить изменения в репозиторий (Место, где хранится код) должным образом.
- Переходим: https://github.com/
- Нажимаем Sign up в правом верхнем углу.
- Вводим свою почту
- Придумываем пароль
- Создаём себе крутой ник
- Соглашаемся или отказываемся от рассылки.
- Решаем капчу и создаём аккаунт!
- Готово!
Скрываем свою почту (Опционально, рекомендуется)
Некоторые из вас не захотят показывать в своём резюме, что они работали над какими-то сомнительными проектами. Или более приближённо, сообщество SS13 мрачно и полно ужасов, и вам захочется защитить свою почту (или использовать подставную почту в первую очередь). О, и вам наверняка захочется редактировать ERP сервера под альтернативным именем.
По умолчанию включено, но лучше перестраховаться
- Заходим в аккаунт на Github
- В правом верхнем углу нажимаем на свой профиль
- Появится список, выбираем "настройки"
- Переходим к Emails
- Включаем настройку Keep my email addresses private. Теперь Github будет использовать безответны письма при операциях.
- Теперь вы защищены лучше!
Настраиваем Git (Опционально)
- Переходим: https://help.github.com/articles/set-up-git/#setting-up-git
- Следуя гайду выше, вы можете установить Git для Windows если хотите, однако это не рекомендуется
- Теперь у вас есть полностью настроенный Git, но если вы неграмотны в написании кода, как я, то вам захочется иметь какую-нибудь причудливую графику!
Дополнительная помощь
Вспомогательные видео (на английском) для лучшего понимания Github
Forking ParaCode
Теперь, посетите Paradise Github репозиторий Вам нужно будет нажать Fork button в правом верхнем углу.
 (нужен файл)
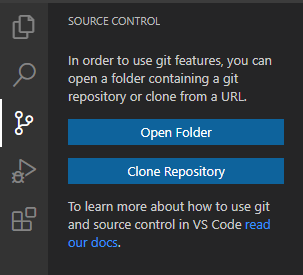
Ого, у вас теперь есть свой репозиторий! Теперь, давайте скомбинируем ваш репозиторий и VS Code! Вернитесь в VS Code и перезапустите его. Под меню настройки версии (выглядит как ветка дерева) нажмите Clone Repository. Это должно будет выглядеть так:
Если этой кнопки там нет, то вы можете нажать комбинацию Ctrl+Shift+P что бы открыть список команд, затем введите туда Git: Clone и нажмите enter.
Теперь, вставьте URL ссылку репозитория, который вы создали пару шагов назад. Оно должно быть похоже на такую ссылку: https://github.com/YOURNAME/Paradise Далее выберите папку, в которой будет хранится локальный репозиторий. Процесс загрузки может занять много времени, налейте себе чаю. После загрузки откройте эту папку в VS Code. Теперь у вас есть локальная копия кода!
Расширения VS Code
Нажмите на кнопку "Extensions" (расширения) на левой панели (выглядит как кучка квадратов), или нажмите комбинацию Ctrl+Shift+X. Вы должны будете увидеть количество рекомендованных расширений. Если нет, пропишите @recommended в поисковую строку. По крайней мере вы захотите установить необходимые расширений из списка ниже. Удобные к имению расширения не обязательны, но значительно облегчат вам работу.
Необходимые расширения
- BYOND DM Language Support - подсветка синтаксиса для DM языка
- DreamMaker Language Client - необычные функции, такие как отладка и переход к определениям
- EditorConfig for VS Code - загружает стандартную конфигурацию редактора для кодовой базы
- ESlint - предоставляет список для Javascript (этот необходим только если вы планируете работать с TGUI)
Nice-to-have Extensions
- GitLens - предоставляет классные фичи, такие как возможность выбрать строчку и увидеть время последней редакции и кто её редактировал
- Error Lens - подсветка строк кода, в которых есть ошибки и показывание ошибок в той же строчке
- GitHub Pull Requests - позволяет сделать запрос помощи прямо из редактора
- Git Graph - позволяет более визуально удобно работать с ветвями
Добавляем Paracode как верхний репозиторий
Нам надо добавить главный Paradise репозиторий в качестве удалённого репозитория.
чтобы сделать это, откройте командную палитру, введите Git: Add Remote и нажмите enter. Далее, вам предложит ввести URL ссылку , а потом и имя удалённого репозитория. Вводим https://github.com/ss220-space/Paradise в качестве URL ссылки, и upstream в качестве имени. После завершения вы будете иметь главный Paradise репозиторий в качестве верхнего удалённого: Это позволит вам легко отправлять запросы о помощи позже.
Making Changes
First, let’s talk about branches. First thing to do is to make a new branch on your fork. This is important because you should never make changes to the default(master) branch of your fork. It should remain as a clean slate.
For every PR you make, make a new branch. This way, each of your individual projects have their own branch. A commit you make to one branch will not affect the other branches, so you can work on multiple projects at once.
Branching
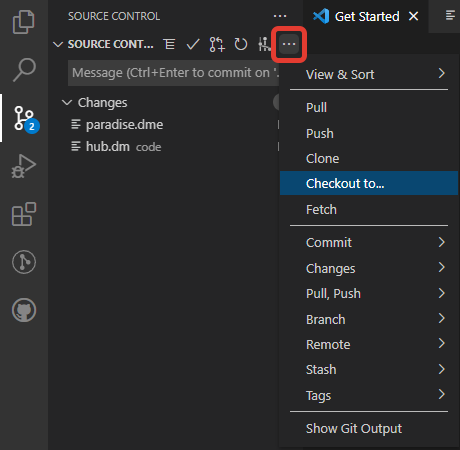
To make a new branch, open up the source control sidebar. Navigate to the More Actions menu (looks like ...) and click Checkout to... like this:
Then, click Create new branch. For this guide, I’ll be creating a new hat, so I’ll name my branch hat-landia. If you look at the bottom left hand corner, you’ll see that VS Code has automatically checked out our branch:![]()
Remember, never commit changes to your master branch! You can work on any branch as much as you want, as long as you commit the changes to the proper branch.
Go wild! Make your code changes! This is a guide on how to contribute, not what to contribute. So, I won’t tell you how to code, make sprites, or map changes. If you need help, try asking in the #spriting or the #coding_chat Discord channels.
Changing Code
You’ll find your code to edit in the Explorer sidebar of VS Code; if you need to find something, the Search sidebar is just below that.
Old-school style: If you want to use DreamMaker instead, go ahead and edit your files there - once you save them, VS Code will detect what you’ve done and you’ll be able to follow the guide from there.
Now, save your changes. If we look at the Source Control tab, we’ll see that we have some new changes. Git has found every change you made to your fork’s repo on your computer! Even if you change a single space in a single line of code, Git will find that change. Just make sure you save your files.
Testing Your Code
The easiest way to test your changes is to press F5. This compiles your code, runs the server and connects you to it, as well as automatically giving you admin permissions. It also starts a debugger that will let you examine what went wrong when a runtime error happens. If you want to avoid the debugger press Ctrl + F5 instead.
This does not automatically make you an administrator in-game so you will need to copy everything from /config/example into /config. Then you will need to edit the /config/config.toml file by adding a {ckey = "Your Name Here", rank = "Hosting Provider"} line to the admin_assignments list.
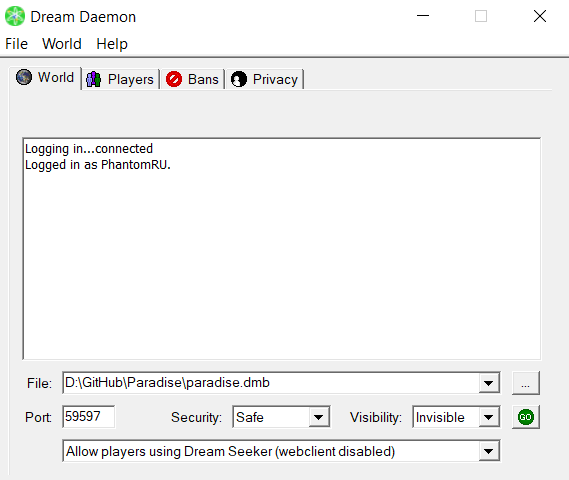
This compiles the code to a dmb file. Then you can run Dream Daemon, select the dmb file, set security to Trusted and hit GO to run the server. After the server starts you can press the button above the GO / STOP button (now red) to connect.
Be sure to always test not only if your changes work, but also if you didn’t actually break something else that might be related.
Committing to Your Branch
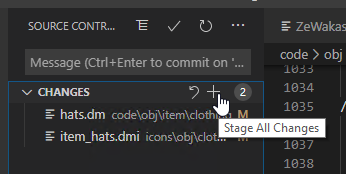
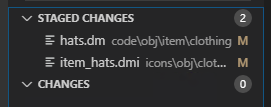
Hover over the word Changes and press the plus sign to stage all modified files. It should look like this:
Or, pick each file you want to change individually. Staged files are the changes you are going to be submitting in commit, and then in your pull request. Once you’ve done that, they’ll appear in a new tab called Staged Changes.
Click on one of the code files you’ve changed now! You’ll see a compare of the original file versus your new file pop up. Here you can see, line by line, every change that you made. Red lines are lines you removed or changed, and green lines are the lines you added or updated. You can even stage or unstage individual lines, by using the More Actions (...) menu in the top right.
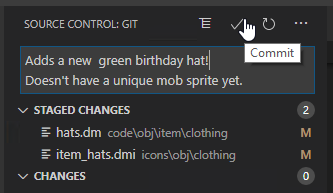
Now that you’ve staged your changes, you’re ready to make a commit. At the top of the panel, you’ll see the Message section. Type a descriptive name for you commit, and a description if necessary. Be concise!
Make sure you’re checked out on the new branch you created earlier, and click the checkmark! This will make your commit and add it to your branch. It should look like this:
There you go! You have successfully made a commit to your branch. This is still ‘unpublished’, and only on your local computer, as indicated by the little cloud and arrow icon in the bottom left corner.
Publishing to GitHub
Click the GitHub icon on the left sidebar. It looks like a cat in circle. Now, you’ll want to click the + sign that appears in the top left, like this:
Then, select the upstream repo and target the master branch. Then, you’ll be able to select the title of your PR. The extension will make your PR with your selected title and a default description. BEFORE SUBMITTING: ensure that you have properly created your PR summary and followed the description template.
A note on changelogs. Changelogs should be player focused, meaning they should be understandable and applicable to your general player. keep it simple,
fix: fixed a bug with X when you Y
tweak: buffed X to do Y more damage.
Avoid coding lingo heavy changelogs and internal code changes that don't visibly affect player gameplay. These are all examples of what you shouldn't add:
tweak: added the NO_DROP flag to X item.
tweak: refactored DNA to be more CPU friendly
ShareX is a super useful tool for contributing as it allows you to make gifs to display your changes. you can download it, here
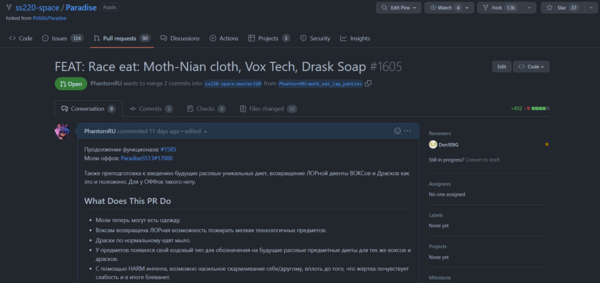
if all goes well, your PR should look like this:
If you want to add more commits to your PR, all you need to do is just push those commits to the branch.
Learning how to code
Now that you've set up everything there's just a little bit more to go. Now we're getting to the harder part, we have to learn logic and code. Don't fear however. There's a nifty guide on the github that will help you out!
STOP: At this point, if you're a beginner, you are good to go, everything below this is additional instructions for setting up other IDEs and advanced information
Setting up & Using TortoiseGit
- Go here: http://code.google.com/p/tortoisegit/wiki/Download
- Download the right TortoiseGit for your system.
- When installing, click OpenSSH rather than TortoisePLink
- Finish installing.
- RESTART YOUR COMPUTER THIS IS NOT A DRILL.
Forking Code
See this
Downloading the Code
- Find a place you don't mind the code sitting.
- Right click and choose Git Clone...
- The URL field should be filled with the URL of your Fork. If not, paste it in.
- Click Next and watch flying tortoises bring you your code.
Setting up TortoiseGit
- Right click on the folder that was created (usually called Paradise), and go to TortoiseGit and then click on Settings.
- Click on Remote under Git.
- There should be one thing on the list of remotes, with the name: origin.
- You're now adding the main repository as a source you can pull updates from.
- In the Remote box type in upstream.
- In the URL: box put: https://github.com/ss220-space/Paradise.git
- Click Add New/Save.
- Click Ok.
- Almost done!
Updating your Repository
- Updating your repo with the master should be done before trying anything.
- Right-click the folder your repo is in and select TortoiseGit then Pull.
- Click the radial button next to Remote and make sure upstream (or whatever you called it) is selected next to it.
- The remote branch should be set to master.
- Then click Ok. This will pull the latest changes from the master repo.
Making a Branch
Branching your repo is very important for organising your commits, you should have a different branch for each unrelated code change (e.g. if you wanted to make some new sprites for one item and change the properties of another these should be in seperate branches), as Pull requests work off branches rather than commits this will allow you to make a seperate Pull Request per change. Doing this streamlines the whole process and will save everyone a bunch of headaches.
- Right-click in your working folder. Then choose TortoiseGit, and Create Branch...
- Type in your new branch name
- (Optional) Tick Switch to new branch
- Press Okay and your new branch is created
Switching between Branches
- Right-click in your working folder. Then choose TortoiseGit, and Switch/Checkout...
- Choose your Branch then press Okay
Making a Commit
- A commit is confirmed change of the files in your repo, it's how you make changes permanently to the files in your repo, so try not to commit without making sure it works (though subsequent commits can fix it).
- As said before, you should use different branches to separate your commits/changes. Don't commit to master. It should be clean, so you can fall back on it if needed.
- To make your commits, you need to edit the files using BYOND's inbuilt editing tools. Make sure to follow coding standards when making your changes! When you're finished, right click the folder you're working with and choose Git Commit -> "[Your Branch Name]" (Example: Git Commit -> "My_First_Branch")
- You can then select only the files you want to be committed by ticking or unticking them. You should also write a detailed commit summary, detailing what happened in that commit.
- Click Ok and the commit will be committed to your local repo!
Making a Pull Request
- Right-click in your working folder. Then choose TortoiseGit, and Push...
- Set Local and Remote to the name of the branch you committed before. (e.g. My_First_Branch)
- Under Destination, set Remote: to origin.
- Click Ok. This'll upload your changes to your remote repo (the one on GitHub).
- Head to your GitHub repo e.g https://github.com/NAME/Paradise
- Click Pull Request at the top right.
- Fill out a summary and then create the pull request.
- You're done! In many cases there will be issues pointed out by other contributors, unfortunate merge conflicts, and other things that will require you to revisit your pull request.
- Optionally, view Clean Commits for a guide on cleaner commit logs, cleaner commits help maintainers review!
Clean commits / Squashing commits(Optional)
- Your commit logs are filthy, full of one or two line commits that fix an error that makes you look bad, and the commit is called "Whoops" or "oops"
- Navigate to your local version of the branch
- Ensure it is up to date with the remote
- Go to Show log
- Select all the commits associated with this change or PR
- Right click and choose Combine to one commit
- This will open up the standard commit interface for TortoiseGit, with the commit logs of the selected commits merged together
- Perform the normal routine for a commit
- Go to push your branch to the remote branch
- Ensure Force Overwrite Existing Branch (may discard changes) is selected to make sure the PR/Remote updates to contain just this squashed commit
Setting up & Using Github Desktop
- Go here: https://desktop.github.com/
- Download the Github Desktop for your system.
- Wait till the installer is done and you're done installing!
- Follow the steps to sign into github.
Forking Code
See this
Downloading the Code
- Open Github Desktop
- Select "File", "Clone repository.."
- Select your forked Paradise repository.
- Select a suitable path of where the repository will be cloned into.
- Press Clone and wait till it's done.
Updating your Repo
- Updating your repo with the master should be done before trying anything.
- Open Github Desktop and select your repository
- Click on the branch selection dropdown. And select your master
- Click on Choose a branch to merge into master
- Find the upstream/master branch and select it.
- Press the Merge upstream/master into master
Making a Branch
- Branching your repo is very important for organising your commits, you should have a different branch for each unrelated code change (e.g. if you wanted to make some new sprites for one item and change the properties of another these should be in seperate branches), as Pull requests work off branches rather than commits this will allow you to make a seperate Pull Request per change. Doing this streamlines the whole process and will save everyone a bunch of headaches.
- Open Github Desktop and select your repository
- Click on the branch dropdown and click New branch.
- Give it a suitable name and then click Create branch
Switching between branches
- Open Github Desktop and select your repository
- Click on the branch dropdown and select the branch you want to switch to.
- If you have open changes then it might fail. Either stash, commit or discard the open changes and try again.
Making a Commit
- A commit is confirmed change of the files in your repo, it's how you make changes permanently to the files in your repo, so try not to commit without making sure it works (though subsequent commits can fix it).
- As said before, you should use different branches to separate your commits/changes. Don't commit to master. It should be clean, so you can fall back on it if needed.
- To make your commits, you need to edit the files using BYOND's inbuilt editing tools or any other editing tool such as Visual Studio Code. Make sure to follow coding standards when making your changes!
- Open Github Desktop and select your repository
- Check the changes once more over in the application.
- Give in the commit message
- Optional, give in a Description
- Press Commit to BRANCH NAME
Making a Pull Request
- Open Github Desktop and select your repository
- Press the Public branch button
- Head to your GitHub repo e.g https://github.com/NAME/Paradise
- Click Pull Request at the top right.
- Fill out a summary and then create the pull request.
- You're done! In many cases there will be issues pointed out by other contributors, unfortunate merge conflicts, and other things that will require you to revisit your pull request.
Как делать предложения правок на GutHub
Файл:GitHub как делать ревью 1.png Файл:GitHub как делать ревью 2.png
Learning how to use TGUI
If you're still brand new, it's recommended that you pick up DM more before moving on to TGUI. All of our user interfaces (except OOC stuff like admin panels) are made using TGUI, or need to be converted to TGUI as some point. (This is where you come in!)
TGUI uses InfernoJS(based off of reactJS) which is an extension to javascript. It can be daunting to learn because it's in a completely different language but don't fear! There's plenty of guides you can follow.
Guides
TGUI is simple but hard to understand to someone unfamiliar to it. READ THESE GUIDES.
Make sure to Read these in order
- A re-introduction to JavaScript
- Guide to using ReactJS <- We do not actually use react but this is super helpful
- Brief rundown of InfernoJS
- TGUI Tutorials and Examples
| Как внести свой вклад? | |
|---|---|
| Общее | Руководство по разработке |
| Сервер | Настройка базы данных, Запуск локального сервера |
| Код | Структура кода SS13, SS13 для опытных программистов, Форматирование текста, Как делать перевод игры |
| Маппинг | Руководство по маппингу |
| Спрайтинг | Руководство по спрайтингу |
| Вики | Руководство по редактированию вики |


